> For the complete documentation index, see [llms.txt](https://miguelapps.gitbook.io/instructions-restaurant-app/llms.txt). Markdown versions of documentation pages are available by appending `.md` to page URLs; this page is available as [Markdown](https://miguelapps.gitbook.io/instructions-restaurant-app/building-a-splash-screen-in-react-native/change-the-splash-screen-logo.md).
# Android
**Android**
Similarly, changing the splash screen in Android is done natively to boost startup performance tremendously. To change the splash screen of our React Native templates, locate the **android/app/src/main/res/launch\_screen.xml** and make changes there.
You can open the android project in Android Studio, if you want to use the interface builder (drag-and-drop) to make visual changes to the launch screen.
Now let’s demonstrate how to build a splash screen for Android in React Native.
Next, create a file called `launch_screen.xml` in `app/src/main/res/layout` (create the `layout`-folder if it doesn’t exist). Add the code below to the `launch_screen.xml`:
Now let’s demonstrate how to build a splash screen for Android in React Native.
Navigate into the `Android` folder, select `app`, `src,` `main`, `java`, and open `MainActivity.java`. Update `MainActivity.java` to use `react-native-splash-screen` with the code below:
```
package com.mysplashscreen;
import android.os.Bundle; // here
import com.facebook.react.ReactActivity;
import org.devio.rn.splashscreen.SplashScreen; // here
public class MainActivity extends ReactActivity {
/**
* Returns the name of the main component registered from JavaScript. This is used to schedule
* rendering of the component.
*/
@Override
protected String getMainComponentName() {
return "MySplashScreen";
}
@Override
protected void onCreate(Bundle savedInstanceState) {
SplashScreen.show(this); // here
super.onCreate(savedInstanceState);
}
}
```
Next, create a file called `launch_screen.xml` in `app/src/main/res/layout` (create the `layout`-folder if it doesn’t exist). Add the code below to the `launch_screen.xml`:
```
```
Note: The `android:src="@drawable/launch_screen"` is equivalent to ` ` in HTML so be sure to replace the `launch_screen` with the actual name of the image you generated from `Appicon`.
Copy all the assets for `Android` into the `res` folder. Create `colors.xml` in the values folder and add a color called `primary_dark` in `app/src/main/res/values/colors.xml`.
```
#000000
```
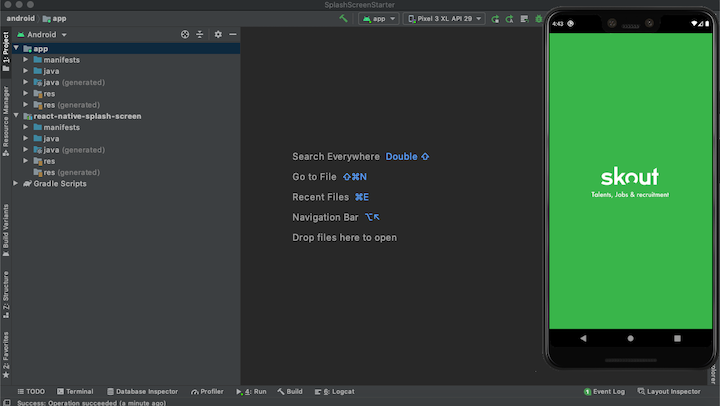
Open the `Android` folder in `Android Studio`, open `AVD`, and run your application as shown below. If everything is set up correctly, you should see a result similar to the following screenshot:
Lastly, to hide the splash screen on app load, you’ll need to do two things:
1. Import the `react-native-splash-screen` package into the root component (`App.js`) of your React Native app
2. Use `React.useEffect()` to hide the splash screen with the code below:
```
/**
* Sample React Native App
* https://github.com/facebook/react-native
*
* @format
* @flow strict-local
*/
import React from 'react';
import {
TouchableOpacity, View
} from 'react-native';
import {NavigationContainer, DefaultTheme } from '@react-navigation/native';
//Import react-native-splash-screen.
import SplashScreen from "react-native-splash-screen";
import {Login} from "./screens";
const theme = {
...DefaultTheme,
colors:{
...DefaultTheme.colors,
border: "transparent",
}
}
const App = () => {
//Hide Splash screen on app load.
React.useEffect(() => {
SplashScreen.hide();
});
return (
);
};
export default () => {
return ;
};
```
` in HTML so be sure to replace the `launch_screen` with the actual name of the image you generated from `Appicon`.
Copy all the assets for `Android` into the `res` folder. Create `colors.xml` in the values folder and add a color called `primary_dark` in `app/src/main/res/values/colors.xml`.
```
#000000
```
Open the `Android` folder in `Android Studio`, open `AVD`, and run your application as shown below. If everything is set up correctly, you should see a result similar to the following screenshot:

Lastly, to hide the splash screen on app load, you’ll need to do two things:
1. Import the `react-native-splash-screen` package into the root component (`App.js`) of your React Native app
2. Use `React.useEffect()` to hide the splash screen with the code below:
```
/**
* Sample React Native App
* https://github.com/facebook/react-native
*
* @format
* @flow strict-local
*/
import React from 'react';
import {
TouchableOpacity, View
} from 'react-native';
import {NavigationContainer, DefaultTheme } from '@react-navigation/native';
//Import react-native-splash-screen.
import SplashScreen from "react-native-splash-screen";
import {Login} from "./screens";
const theme = {
...DefaultTheme,
colors:{
...DefaultTheme.colors,
border: "transparent",
}
}
const App = () => {
//Hide Splash screen on app load.
React.useEffect(() => {
SplashScreen.hide();
});
return (
);
};
export default () => {
return ;
};
```
Thanks to [LogRocket](https://logrocket.com/) I learned this about React Native, and of course thanks [to his Blog](https://blog.logrocket.com/), also to the tutorials the [Emmanuel Etukudo](https://blog.logrocket.com/author/emmanueletukudo/) tutorial