iOS

iOS

To change the splash screen on iOS, you need to open the native project in Xcode (the .xcworkspace file from the ios/ folder) and locate the LaunchScreen.xib file.

You can then drag and drop views, change images & texts, and add constraints into the Interface Builder.

Note: The reason why this has been done natively is performance. Any JavaScript library managing the splash screen creates a ton of latency at app start up, which would have been a poor user experience.

Open AppDelegate.m and replace the code with the code below:

#import "AppDelegate.h"
#import <React/RCTBridge.h>
#import <React/RCTBundleURLProvider.h>
#import <React/RCTRootView.h>
// Import RNSplashScreen
#import "RNSplashScreen.h"
#ifdef FB_SONARKIT_ENABLED
#import <FlipperKit/FlipperClient.h>
#import <FlipperKitLayoutPlugin/FlipperKitLayoutPlugin.h>
#import <FlipperKitUserDefaultsPlugin/FKUserDefaultsPlugin.h>
#import <FlipperKitNetworkPlugin/FlipperKitNetworkPlugin.h>
#import <SKIOSNetworkPlugin/SKIOSNetworkAdapter.h>
#import <FlipperKitReactPlugin/FlipperKitReactPlugin.h>
static void InitializeFlipper(UIApplication *application) {
  FlipperClient *client = [FlipperClient sharedClient];
  SKDescriptorMapper *layoutDescriptorMapper = [[SKDescriptorMapper alloc] initWithDefaults];
  [client addPlugin:[[FlipperKitLayoutPlugin alloc] initWithRootNode:application withDescriptorMapper:layoutDescriptorMapper]];
  [client addPlugin:[[FKUserDefaultsPlugin alloc] initWithSuiteName:nil]];
  [client addPlugin:[FlipperKitReactPlugin new]];
  [client addPlugin:[[FlipperKitNetworkPlugin alloc] initWithNetworkAdapter:[SKIOSNetworkAdapter new]]];
  [client start];
}
#endif
@implementation AppDelegate
- (BOOL)application:(UIApplication *)application didFinishLaunchingWithOptions:(NSDictionary *)launchOptions
{
#ifdef FB_SONARKIT_ENABLED
  InitializeFlipper(application);
#endif
  RCTBridge *bridge = [[RCTBridge alloc] initWithDelegate:self launchOptions:launchOptions];
  RCTRootView *rootView = [[RCTRootView alloc] initWithBridge:bridge
                                                   moduleName:@"MySplashScreen"
                                            initialProperties:nil];
  rootView.backgroundColor = [[UIColor alloc] initWithRed:1.0f green:1.0f blue:1.0f alpha:1];
  self.window = [[UIWindow alloc] initWithFrame:[UIScreen mainScreen].bounds];
  UIViewController *rootViewController = [UIViewController new];
  rootViewController.view = rootView;
  self.window.rootViewController = rootViewController;
  [self.window makeKeyAndVisible];
  // Set the splash screen to show by default.
  [RNSplashScreen show]; 
  return YES;
}
- (NSURL *)sourceURLForBridge:(RCTBridge *)bridge
{
#if DEBUG
  return [[RCTBundleURLProvider sharedSettings] jsBundleURLForBundleRoot:@"index" fallbackResource:nil];
#else
  return [[NSBundle mainBundle] URLForResource:@"main" withExtension:@"jsbundle"];
#endif
}
@end

Here, we made two significant changes to the AppDeligate file. First, we imported the RNSplashScreen we installed earlier into the AppDeligate.m. Next, we set the RNSplashScreen to show by default with the code [RNSplashScreen show].

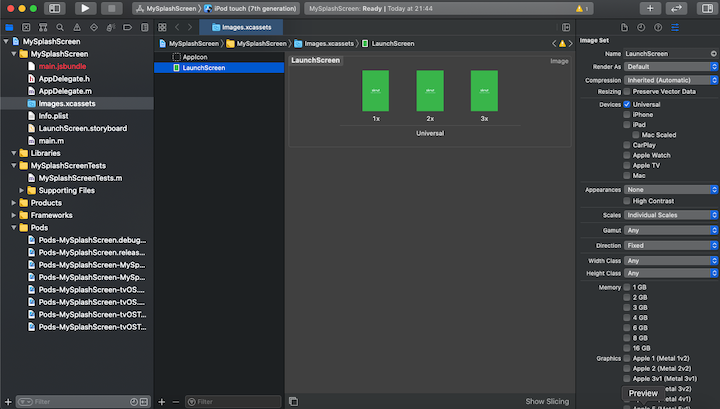
Open the project workspace in Xcode, click images.xcassets, right-click below Appicon, and choose your image. Set the image name to LaunchScreen, open the assets folder, navigate to the Images folder, and open the iOS folder. Inside the splash folder, drag the three images over the three boxes on Xcode named 1x, 2x, 3x:

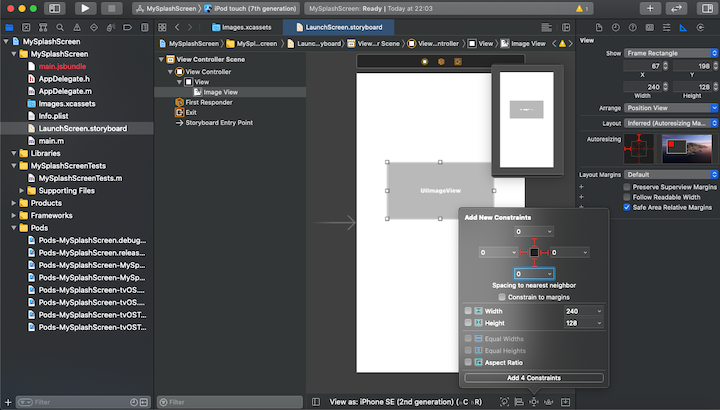
Next, select LaunchScreen.storyboard. Under View, select the labels SplashScreen and “Powered by React Native,” and press delete on your keyboard. Select view and click the ruler icon. Uncheck “Safe Area Layout Guide,” then click the plus icon + to search for an image. Drag the image view to the view. Finally, click on the constraints icon and set all the constraints to 0:

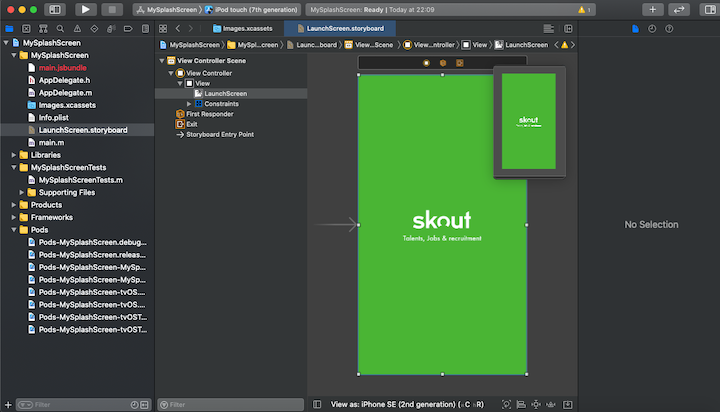
Now that we have our image view setup, click the image property icon and change the image to LaunchScreen. Set the content mod to aspect fill, as shown below:

To confirm your application can run successfully, run a build from Xcode. You should see something like this:

Last updated